Thursday, August 30, 2012

Big Button Pillow Tutorial - Making Something Out of Nothing

Make a custom, big button pillow out of scraps!!
I wanted to make pillow for my aunt that coordinated with a quilt I'd done for her a few years ago. After I went into my scrap stash I realized I had plenty to work with! Who says hoarding is a bad thing!!!
I wanted to make use of an existing pillow form but as you can tell it was pretty flat and out of shape.
To remedy that I cut into the cover and plumped it up with batting.
Then I stitched it shut and added a couple drops of E-6000 glue to secure the end of the thread. A little goes a long way and I made sure to use just a dab so there wouldn't be a crunchy spot.

Next I ironed out my scraps, luckily some were large, and then I squared off the edges. I like a nice, crisp cut on certain projects. The pillow form was originally 20X20 but I decided to cut the cover at 18 3/4 inches so it would fit snugly over the form.
I eye-balled the measurement, lined up the sides and stitched them on my machine, using a 1/4 inch seam. Then I cut it to my 18 3/4 inch specifications. I repeated the process for side two.

When I came up a little short I added a strip to the bottom, remembering some of the best advice I've ever heard. "If its too short add some...if its too long, cut some off." Simple, and no stress!
I stitched the front and back together (right sides facing) on three sides and left the bottom open.
A quick press with the iron will set the seam nicely and trimming off the corners decreases bulk.


Next, flip it right side out and give a quick press to the side seams for a crisper edge. I pressed the corners to a sharper point with my seam tool, but a pencil or ruler would work just the same.

Once the pillow is stuffed in tightly (I had to work the funky form a little bit to get an even look) pin the open end closed. I rolled the edges under.

Thread a needle and use small stitches across the side, making sure to secure the thread tightly at beginning and end.
The only items I bought for this project were a doll making needle, two big buttons and coordinating embroidery floss.
Double thread the floss through the needle and loop it through the button, then tie it securely on the back side.
Press down on the pillow while pushing the needle to the other side to make the button sink in. Place the second button on the back side and make sure the needle comes through where it is centered. Keep pressing on the pillow as you run the needle back and forth a couple times. Once it is tight you can let up on the pressure and do a few more loops until you feel its secure. Make sure there is enough thread remaining to cut it from the needle and tie it under the button on the side you end.
Front and back, depending on preference!

Pin It

Tuesday, August 21, 2012

Glue Resist - Coloring with Stitch

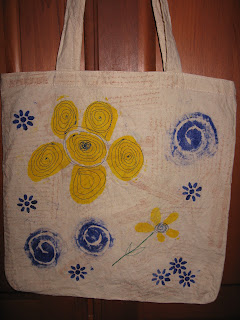
Yay! As promised, here are the final photos of the glue resist bag (scroll down to see the post from a couple weeks ago). I L-O-V-E free form stitching. It is so freeing to just dive in with no expectations of perfection. Messy, swirly fun!!!


I am addicted to doodle flowers so this was right on. I did find out pretty quickly that in order to stitch on painted fabric I had to lower the tension on my machine by quite a bit. It was down to between 2 and 3 for this. I also learned the hard way that you must REMEMBER to readjust the tension before you start another project!

I love blue flowers, probably because they aren't very common in nature. It made perfect sense to me to make the center of this flower blue. I did stick with traditional green for the stem. I can't wait to do more "drawing" on fabric with stitches! 
Pin It

Thursday, August 16, 2012

Mommy Needs A Break!


You may have noticed the postings a little thin this week. Busy busy! One child potty training, the other getting braces, getting organized for back to school and working some extra hours! If only I could sleep sitting up in my sewing room! I've got some great stuff coming up....altered carpi's.....BIG pillow....and that darn bag I promised I would show you this week! Plus my first guest/sponsor tutorial for Katie over at Punk Projects is coming soon! Thanks for stopping by and please check back next week -
I will be here!
Pin It

Tuesday, August 14, 2012

Fabric Scrap Greeting Card

Having a very busy week. Thought I would revisit a fun project from a few months ago!


This is a fun, easy and FAST little project! I am a fabric hoarder and just can't bring myself to toss anything no matter how small. I started a box where I keep the little pieces so I can quickly sift through my collection for a project of this size. This idea came from the book Denyse Schmidt Quilts. Its another great example of finding something new to try and adding your own spin!


I started with a random sheet of paper, folded it in half and tore the outside edges - something about straight, perfect edges makes me crazy!


Next I grabbed some bright scraps from my stash and haphazardly laid them out to cover the front of the card.


Now the fun part! I love using my sewing machine to stitch on paper. I save old needles for this occasion because paper will dull a needle quickly and I want to get as much mileage out of my supplies as I can. Whenever I change my sewing machine needle I put the old one in a holder marked "used" so I always have some on hand for paper.


Keeping old needles for sewing paper is handy.


I chose white thread this time so it would blend with the inside of the card but any color is fine. I sewed from top to bottom and then zig-zagged by way back up and across the card, making sure all the fabric was secured. You want to make sure you don't sew over the fold.


I decided to decorate the front with a fabric flower and planned to use colored thread for doodling. Knowing the color would show up on the inside too I laid out the size of the flower and then placed the stamp to get a general idea if how they would fit.


My first sewing machine doodle! It was fun to do and I quickly realized does not have to be perfect to look cute!! I sewed around the flower I cut out and then swirled to the center.....then nervously turned the card over to see how it looked on the white side. I liked it. The sewing machine stamp showed up well over the thread too, just make sure to press firmly and evenly.


I used a metallic purple colored pencil to shade in the outside edge and blend in better with the colors on the front of the card. Looking back I would do more doodles and decoration on the inside but this was a quick project done between 5 and 6 am while the family slept, before hitting the shower for work. Not a bad start! It was fun and gave me a little creative fix to carry through the hectic day ahead!


Red and purple are one of my favorite color combos!
Pin It

Friday, August 10, 2012

Camp Trailer Bling


So I have a good friend who likes to camp like we do. She and her family have a darling Scamp trailer that they recently updated with new green cushions. For her birthday I took an idea I've seen floating around Pinterest and Etsy and created my own trailer applique. Super fun and funky for a little added bling to their camping adventures!


I got a small pillow form on super sale at Jo-Ann's, cut a wool skirt into the pillow cover size I wanted then added the handmade applique. I sewed on the button wheel and hand stitched the bottom closed. Easy peasy and happy travels!
Pin It

Thursday, August 9, 2012

Today's Gratitude


"Dreams are the touchstones of our character."
- Henry David Thoreau
Pin It

Wednesday, August 8, 2012

Glue Resist Fabric Treatment


I've been reading about different fabric treatments and decided I had to try the Glue Resist technique - where glue is added, paitned over then washed off to create a blank area. I grabbed a plain tote bag, stamped it, then went to work with Elmer's Glue. It had been ages since I'd used Elmer's and it was pretty fun - kinda like being a kid again.


I added a little glue here and there where it shrank and pulled away from itself in the first stages of drying. The drying time took much longer than I expected so I put the bag in the laundry room for a couple days and forgot about it.


Once the glue was totally dry I used acrylic paint on the design areas and stenciled a few additional flowers.


When the paint dried I threw the bag in the washer (on warm) to get rid of the glue.


I really liked the resulting design. This weekend I plan to add free motion stitching to complete the tote.


Ready for stitching! I'll post the grand finale next week!
Pin It
Related Posts Plugin for WordPress, Blogger...